Deep Learning Tools
- tags
- Deep Learning
Tensorflow
What is Tensorflow
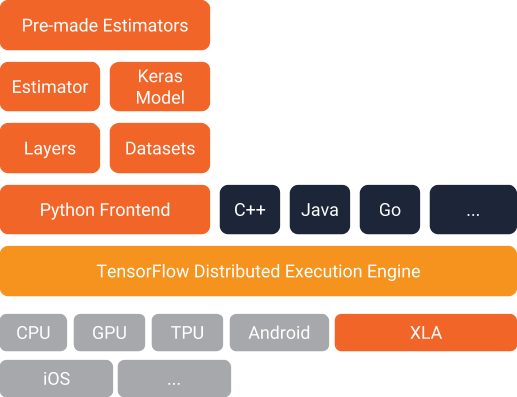
TensorFlow is open-source software library for numerical computation. A graph of computations is defined, and TensorFlow builds an optimized graph from that.
TensorFlow breaks up the graph into several chunks and run them in parallel across multiple CPUs or GPUs where possible, and also supports distributed computing.
Glossary
- tensor
- A tf.Tensor object represents a partially defined computation that will eventually produce a value. TensorFlow programs work by first building a graph of tf.Tensor objects, detailing how each tensor is computed based on the other available tensors and then by running parts of this graph to achieve the desired results.
TF Slim
arg_scope
Example of how to use tf.contrib.framework.arg_scope:
  from third_party.tensorflow.contrib.layers.python import layers

  arg_scope = tf.contrib.framework.arg_scope

  with arg_scope([layers.conv2d], padding='SAME',
                 initializer=layers.variance_scaling_initializer(),
                 regularizer=layers.l2_regularizer(0.05)):
    net = layers.conv2d(inputs, 64, [11, 11], 4, padding='VALID', scope='conv1')
    net = layers.conv2d(net, 256, [5, 5], scope='conv2')
The first call to conv2d will behave as follows:
  layers.conv2d(inputs, 64, [11, 11], 4, padding='VALID',
                initializer=layers.variance_scaling_initializer(),
                regularizer=layers.l2_regularizer(0.05), scope='conv1')
The second call to conv2d will also use the arg_scope’s default for padding:
  layers.conv2d(inputs, 256, [5, 5], padding='SAME',
                initializer=layers.variance_scaling_initializer(),
                regularizer=layers.l2_regularizer(0.05), scope='conv2')
Example of how to reuse an arg_scope:
  with arg_scope([layers.conv2d], padding='SAME',
                 initializer=layers.variance_scaling_initializer(),
                 regularizer=layers.l2_regularizer(0.05)) as sc:
      net = layers.conv2d(net, 256, [5, 5], scope='conv1')
      # ...

  with arg_scope(sc):
      net = layers.conv2d(net, 256, [5, 5], scope='conv2')
Example of how to use tf.contrib.framework.add_arg_scope to enable your function to be called within an arg_scope later:
  @tf.contrib.framework.add_arg_scope
  def conv2d(*args, **kwargs)
TF Serve
TF Estimator
References:
- http://ruder.io/text-classification-tensorflow-estimators/
- https://developers.googleblog.com/2017/12/creating-custom-estimators-in-tensorflow.html
- https://arxiv.org/abs/1708.02637
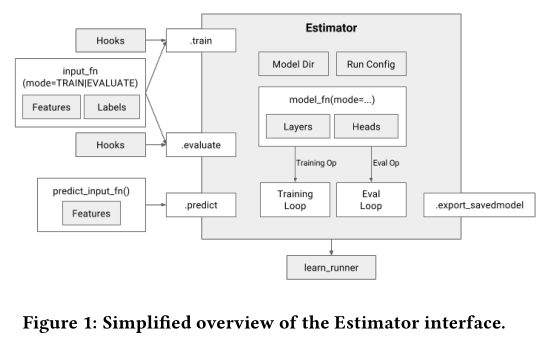
At the heart of our framework is Estimator, a class that both provides
an interface for downstream infrastructure, as well as a convenient
harness for developers. Te interface for users of Estimator is loosely
modeled afer Scikit-learn and consists of only four methods: train
trains the model, given training data. evaluate computes evaluation
metrics over test data, predict performs inference on new data given a
trained model, and fnally, export_savedmodel exports a SavedModel, a
serialization format which allows the model to be used in TensorFlow
Serving, a prebuilt production server for TensorFlow models.
| Estimator method | Mode parameter set |
|---|---|
| train() | ModeKeys.TRAIN |
| evaluate() | ModeKeys.EVAL |
| predict() | ModeKeys.PREDICT |
Estimators receive a configuration object called RunConfig which
communicates everything that the Estimator needs to know about the
environment in which the model will be run: how many workers are
available,, how to save intermediate checkpoints etc.
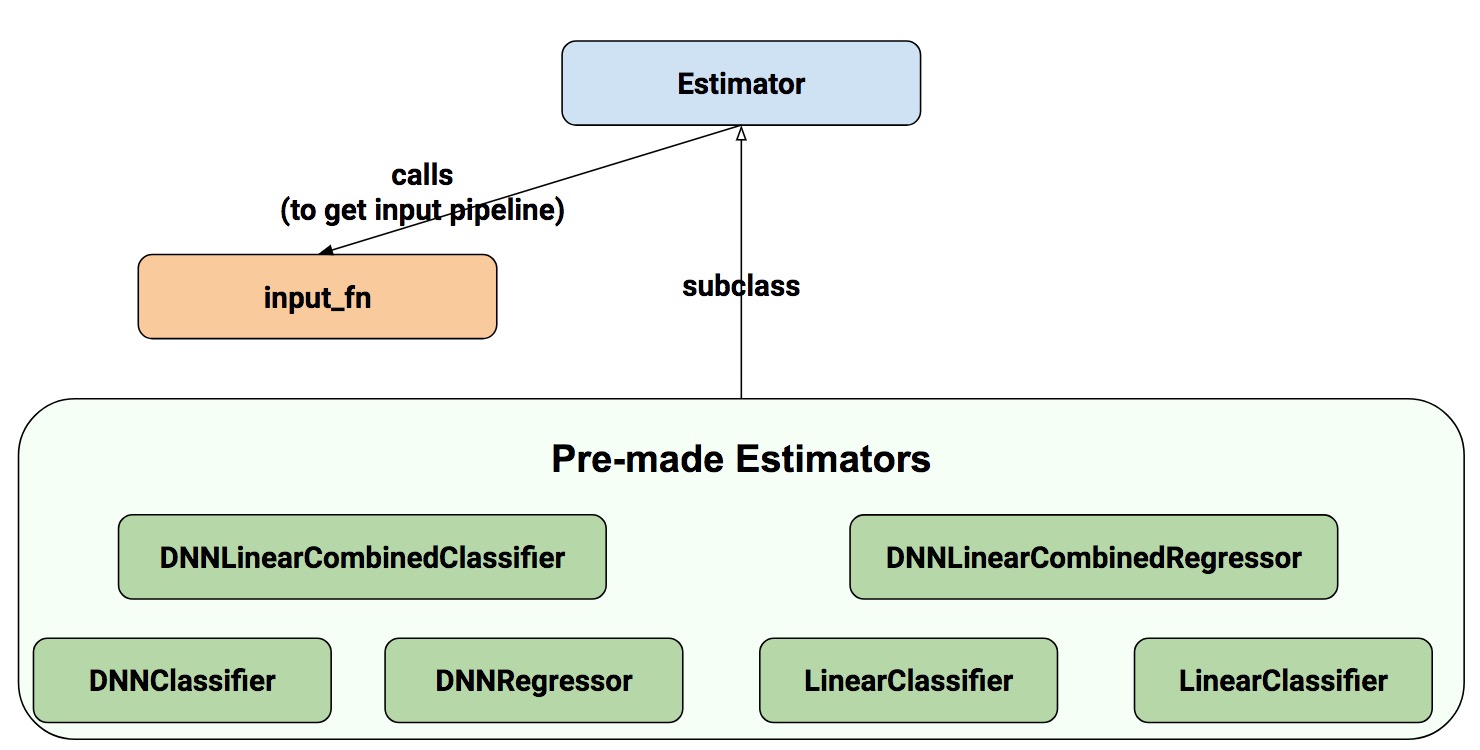
train, evaluate and predict take an input function, which is expected
to produce two dictionaries: one containing Tensors with inputs
(features), and one containing Tensors with labels.
Predict
When model_fn is called with mode == ModeKeys.PREDICT, the model
function must return a tf.estimator.EstimatorSpec containing the
following information:
- the mode, which is
tf.estimator.ModeKeys.PREDICT - the prediction
  # class_ids will be the model prediction for the class (Iris flower type)
  # The output node with the highest value is our prediction
  predictions = { 'class_ids': tf.argmax(input=logits, axis=1) }

  # Return our prediction
  if mode == tf.estimator.ModeKeys.PREDICT:
     return tf.estimator.EstimatorSpec(mode, predictions=predictions)
Eval
When model_fn is called with mode == ModeKeys.EVAL, the model function must evaluate the model, returning loss.
  # To calculate the loss, we need to convert our labels
  # Our input labels have shape: [batch_size, 1]
  labels = tf.squeeze(labels, 1)          # Convert to shape [batch_size]
  loss = tf.losses.sparse_softmax_cross_entropy(labels=labels, logits=logits)
We can also compute and return additional metrics.
  # Calculate the accuracy between the true labels, and our predictions
  accuracy = tf.metrics.accuracy(labels, predictions['class_ids'])
  if mode == tf.estimator.ModeKeys.EVAL:
     return tf.estimator.EstimatorSpec(
         mode,
         loss=loss,
         eval_metric_ops={'my_accuracy': accuracy})
Train
When model_fn is called with mode == ModeKeys.TRAIN, the model
function must train the model.
  optimizer = tf.train.AdagradOptimizer(0.05)
  train_op = optimizer.minimize(
     loss,
     global_step=tf.train.get_global_step())

  # Set the TensorBoard scalar my_accuracy to the accuracy
  tf.summary.scalar('my_accuracy', accuracy[1])

  return tf.estimator.EstimatorSpec(
     mode,
     loss=loss,
     train_op=train_op)
TF Feature Columns
Reference: https://developers.googleblog.com/2017/11/introducing-tensorflow-feature-columns.html
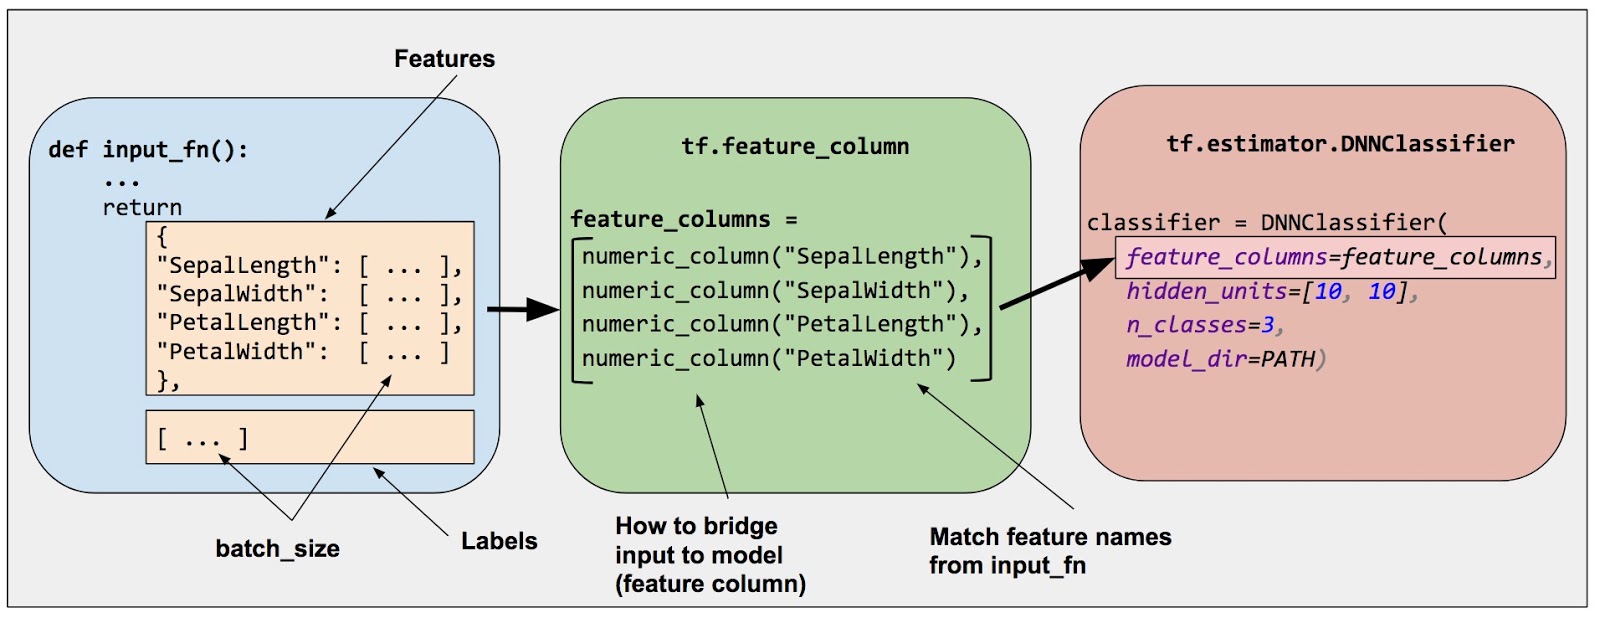
Feature columns bridge raw data with the data your model needs.
There are nine functions in the tf.feature_column api.
Numeric column
  numeric_feature_column = tf.feature_column.numeric_column(key="SepalLength",
                                                            dtype=tf.float64)

  vector_feature_column = tf.feature_column.numeric_column(key="Bowling",
                                                           shape=10)

  matrix_feature_column = tf.feature_column.numeric_column(key="MyMatrix",
                                                           shape=[10,5])
Bucketized column
Often, you don’t want to feed a number directly into the model, but instead split its value into different categories based on numerical ranges. Consider the following bucketing scheme:
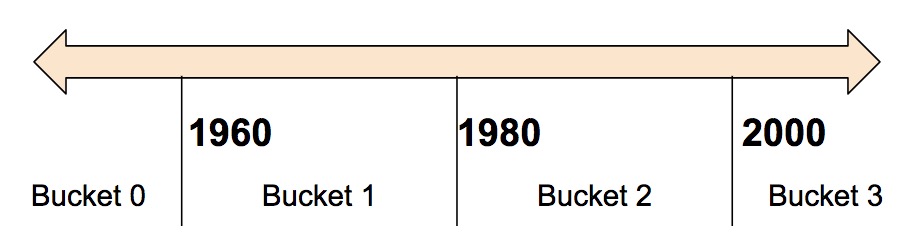
We create the bucketized column from a numeric column:
  # A numeric column for the raw input.
  numeric_feature_column = tf.feature_column.numeric_column("Year")

  # Bucketize the numeric column on the years 1960, 1980, and 2000
  bucketized_feature_column = tf.feature_column.bucketized_column(
      source_column = numeric_feature_column,
      boundaries = [1960, 1980, 2000])
Categorical Identity Column
Categorical identity columns are a special case of bucketized columns. In a categorical identity column, each bucket represents a single, unique integer.
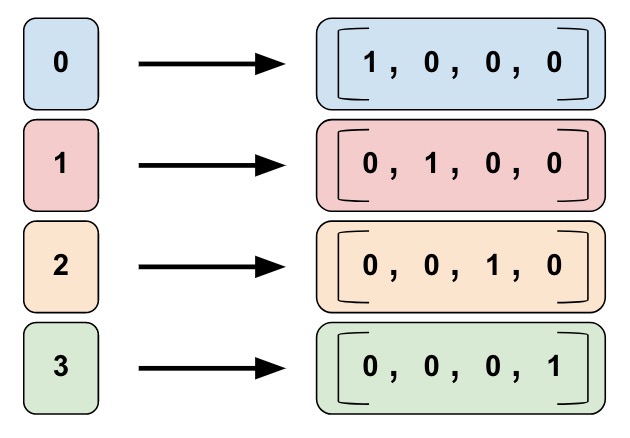
This is a one-hot encoding, not a binary numerical encoding.
  # Create a categorical output for input "feature_name_from_input_fn",
  # which must be of integer type. Value is expected to be >= 0 and < num_buckets
  identity_feature_column = tf.feature_column.categorical_column_with_identity(
      key='feature_name_from_input_fn',
      num_buckets=4) # Values [0, 4)

  # The 'feature_name_from_input_fn' above needs to match an integer key that is
  # returned from input_fn (see below). So for this case, 'Integer_1' or
  # 'Integer_2' would be valid strings instead of 'feature_name_from_input_fn'.
  # For more information, please check out Part 1 of this blog series.
  def input_fn():
      ...<code>...
      return ({ 'Integer_1':[values], ..<etc>.., 'Integer_2':[values] },
              [Label_values])
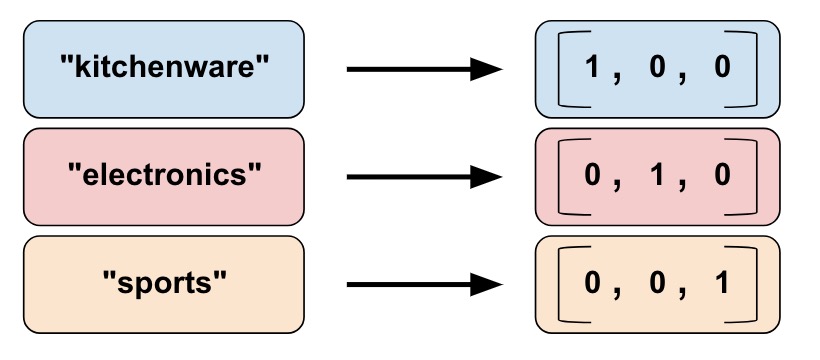
Categorical vocabulary column

We cannot input strings directly to a model. Instead, we must first map strings to numeric or categorical values. Categorical vocabulary columns provide a good way to represent strings as a one-hot vector.
  # Given input "feature_name_from_input_fn" which is a string,
  # create a categorical feature to our model by mapping the input to one of
  # the elements in the vocabulary list.
  vocabulary_feature_column =
      tf.feature_column.categorical_column_with_vocabulary_list(
          key="feature_name_from_input_fn",
          vocabulary_list=["kitchenware", "electronics", "sports"])
In many cases, the number of categories is large, and we can limit it via hashing:
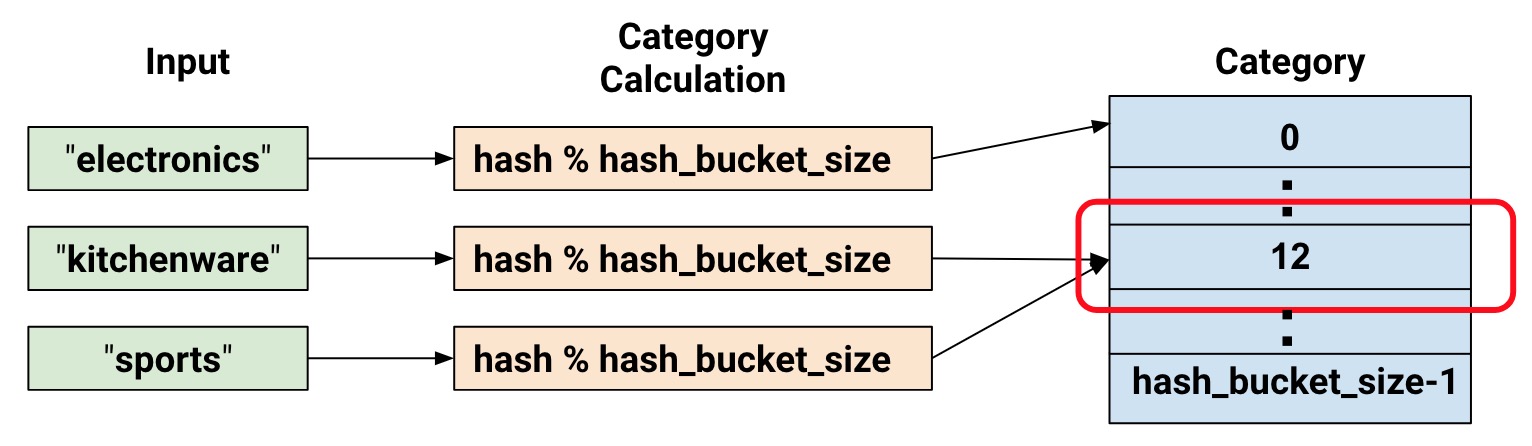
  # Create categorical output for input "feature_name_from_input_fn".
  # Category becomes: hash_value("feature_name_from_input_fn") % hash_bucket_size
  hashed_feature_column =
      tf.feature_column.categorical_column_with_hash_bucket(
          key = "feature_name_from_input_fn",
          hash_buckets_size = 100) # The number of categories
Feature Crosses
Combining features allows the model to learn separate weights specifically for whatever that feature combination means.
  # In our input_fn, we convert input longitude and latitude to integer values
  # in the range [0, 100)
  def input_fn():
      # Using Datasets, read the input values for longitude and latitude
      latitude = ...   # A tf.float32 value
      longitude = ...  # A tf.float32 value

      # In our example we just return our lat_int, long_int features.
      # The dictionary of a complete program would probably have more keys.
      return { "latitude": latitude, "longitude": longitude, ...}, labels

  # As can be see from the map, we want to split the latitude range
  # [33.641336, 33.887157] into 100 buckets. To do this we use np.linspace
  # to get a list of 99 numbers between min and max of this range.
  # Using this list we can bucketize latitude into 100 buckets.
  latitude_buckets = list(np.linspace(33.641336, 33.887157, 99))
  latitude_fc = tf.feature_column.bucketized_column(
      tf.feature_column.numeric_column('latitude'),
      latitude_buckets)

  # Do the same bucketization for longitude as done for latitude.
  longitude_buckets = list(np.linspace(-84.558798, -84.287259, 99))
  longitude_fc = tf.feature_column.bucketized_column(
      tf.feature_column.numeric_column('longitude'), longitude_buckets)

  # Create a feature cross of fc_longitude x fc_latitude.
  fc_san_francisco_boxed = tf.feature_column.crossed_column(
      keys=[latitude_fc, longitude_fc],
      hash_bucket_size=1000) # No precise rule, maybe 1000 buckets will be good?
Indicator and Embedding columns
Indicator columns treat each category as an element in a one-hot vector, where the matching category has value 1 and the rest have 0s.
indicator_column = tf.feature_column.indicator_column(categorical_column)
An embedding column represents data as a lower-dimensional, ordinary vector in which each cell can contain any number.
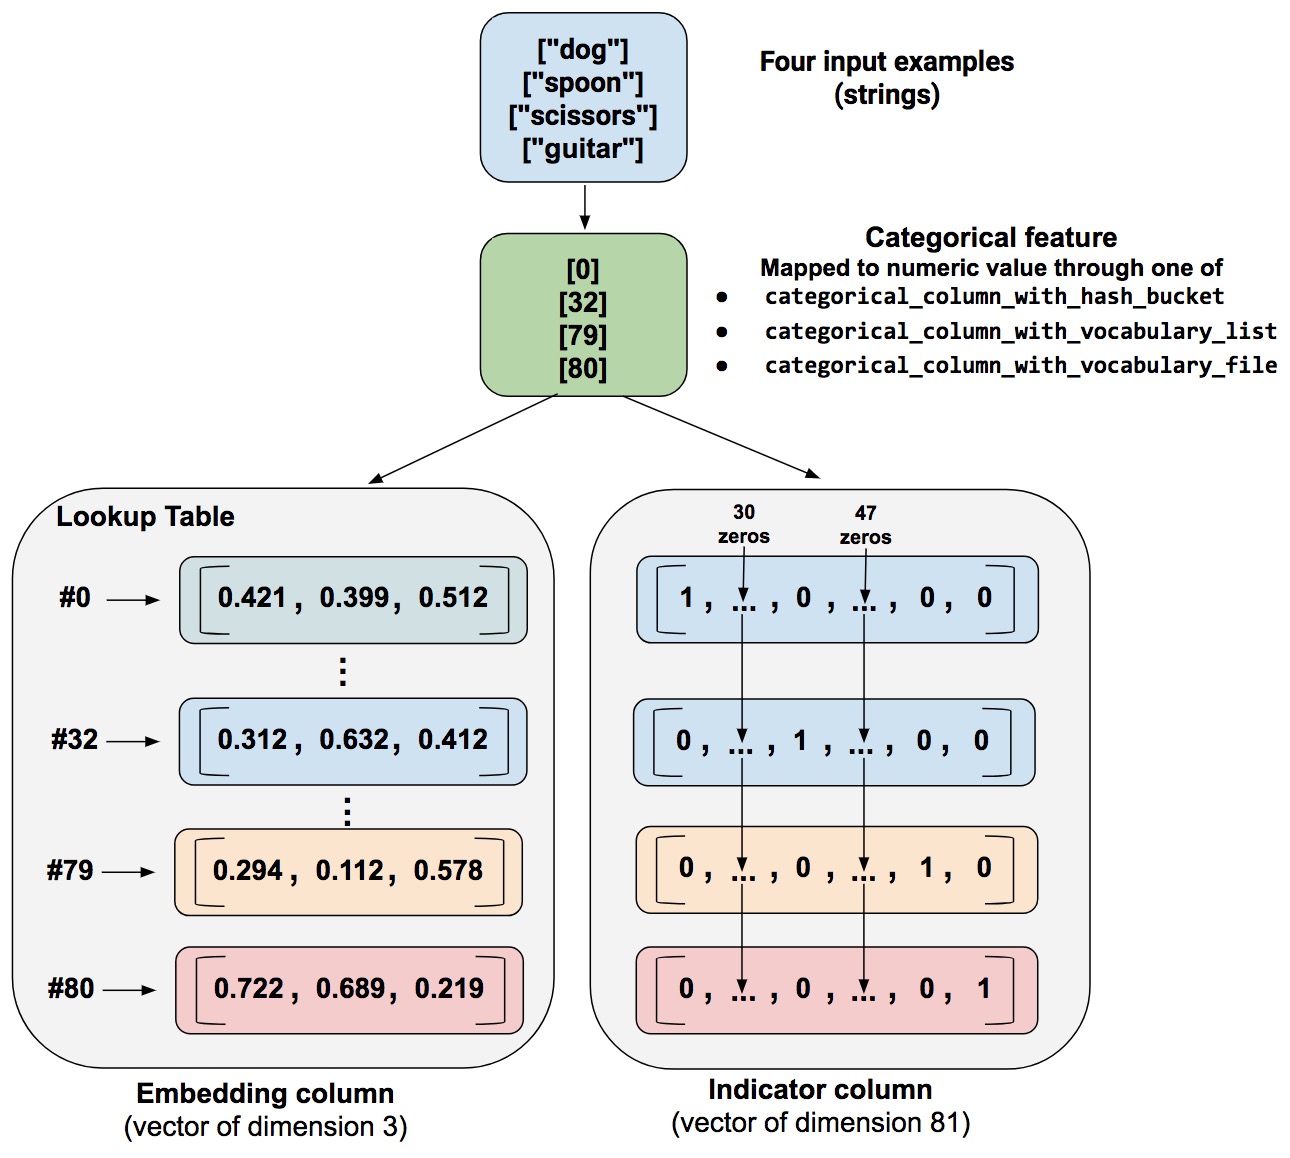
As a guideline, the embedding vector dimension should be the 4th root of the number of categories.
  categorical_column = ... # Create any categorical column

  # Represent the categorical column as an embedding column.
  # This means creating a one-hot vector with one element for each category.
  embedding_column = tf.feature_column.embedding_column(
      categorical_column=categorical_column,
      dimension=dimension_of_embedding_vector)
Hooks
Hooks are useful for custom processing that has to happen alongside
the main loop. For example, we can use hooks for recordkeeping,
debugging, monitoring or reporting. Hooks are activated by passing
them to the train call. Estimators use hooks internally to implement
checkpointing, summaries and more.
  class TimeBasedStopHook(tf.train.SessionRunHook):
      def begin(self):
          self.started_at = time.time()

      def after_run(self, run_context, run_values):
          if time.time() - self.started_at >= TRAIN_TIME:
              run_context.request_stop()
Experiment
The core of the distributed execution support is provided with the
Experiment class.
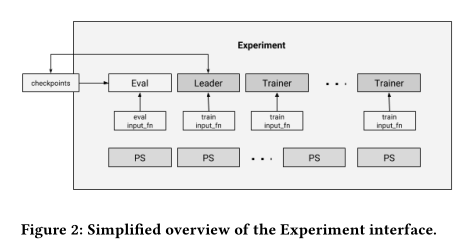
In each TensorFlow cluster, there are several parameter servers, and
several worker tasks. Most workers are handling the training process,
which basically calls the Estimator train method with the training
input_fn.
The primary mode of replica training in Estimators is between-graph replication and asynchronous training.
Partial Run
https://www.tensorflow.org/api%5Fdocs/python/tf/Session#partial%5Frun
Came across this when working with Reinforcement Learning (Knowledge-base Completion). The problem required the network to take evaluate and obtain an action.
  a = array_ops.placeholder(dtypes.float32, shape=[])
  b = array_ops.placeholder(dtypes.float32, shape=[])
  c = array_ops.placeholder(dtypes.float32, shape=[])
  r1 = math_ops.add(a, b)
  r2 = math_ops.multiply(r1, c)

  h = sess.partial_run_setup([r1, r2], [a, b, c])
  res = sess.partial_run(h, r1, feed_dict={a: 1, b: 2})
  res = sess.partial_run(h, r2, feed_dict={c: res})
Partial run continues the execution of a session with more feeds and fetches.
To use partial execution, a user first calls partial_run_setup() and then a sequence of partial_run(). partial_run_setup specifies the list of feeds and fetches that will be used in the subsequent partial_run calls.
The optional feed_dict argument allows the caller to override the value of tensors in the graph.
Debugging Memory Leaks
https://dantkz.github.io/How-To-Debug-A-Memory-Leak-In-TensorFlow/
Finalize the session graph
Finalizing the graph ensures that no new nodes are being added to the graph on each session run, by marking the graph as read-only. Anything that tries to modify the graph will raise an Exception.
Use tcmalloc
tcmalloc suffers less from fragmentation when allocating and deallocating large objects (such as tensors). Some memory-intensive Tensorflow programs have been known to leak heap address space (while freeing individual objects they use) with the default malloc.
tcmalloc also has a heap profiler, which can be analyzed with the google-pprof tool.
TODO What happens when a session is created?
Context: created a dataflow job that created one session each run, which was really slow: 200 workers 1 prediction/s.
Figure out what a tf.Session contains, and how they are initialized with/without graphs.
Optimizing the Input Pipeline
https://www.tensorflow.org/performance/datasets%5Fperformance
- Use
prefetchto overlap the work of a producer and consumer - Cache the dataset into memory if it can fit
Transitioning to TF 2.0
If you are working on custom architectures, we suggest using tf.keras to build your models instead of Estimator. (Tensorflow, n.d.)
Keras
Keras is a high-level neural networks API, compatible with multiple backends. (Keras, n.d.) As of Tensorflow 2.0, Keras will be the primary API for building neural networks.
The Sequential model is a simple model consisting of a linear stack of
layers.
  from keras.models import Sequential
  from keras.layers import Dense

  model = Sequential()
  model.add(Dense(units=64, activation='relu', input_dim=100))
  model.add(Dense(units=10, activation='softmax'))

  model.compile(loss='categorical_crossentropy',
                optimizer='sgd',
                metrics=['accuracy'])


  # x_train and y_train are Numpy arrays --just like in the Scikit-Learn API.
  model.fit(x_train, y_train, epochs=5, batch_size=32)

  # Evaluate performance:
  loss_and_metrics = model.evaluate(x_test, y_test, batch_size=128)

  # Generate predictions on new data:
  classes = model.predict(x_test, batch_size=128)
Bibliography
Keras. n.d. “Home Keras Documentation.” https://keras.io/.
Tensorflow. n.d. “Standardizing on Keras: Guidance on High-Level APIs in TensorFlow 2.0.” https://medium.com/tensorflow/standardizing-on-keras-guidance-on-high-level-apis-in-tensorflow-2-0-bad2b04c819a.